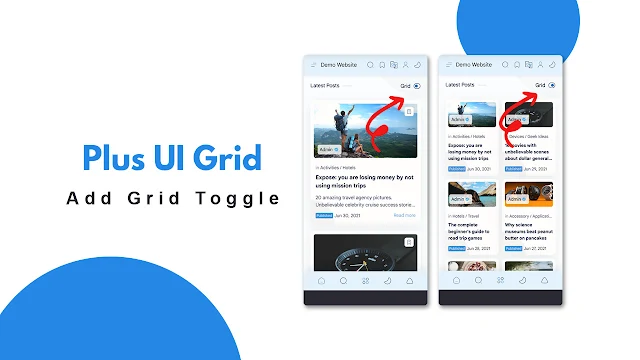
Add Post Grid Toggle in the Plus UI Template
The flexibility of a blog's layout can significantly impact the user experience. The Plus UI template offers an excellent foundation for customization, allowing you to switch between single and dual-grid layouts for your blog posts. This guide will walk you through adding a toggle feature to seamlessly change between these layouts, enhancing both functionality and aesthetics.
Why Use a Toggle for Grid Layouts?
Before diving into the implementation, let's explore the benefits of having a toggle for grid layouts:
- User Experience: Providing readers with layout options can cater to different preferences, improving engagement.
- Aesthetics: Different layouts can highlight various aspects of your content, making your blog visually appealing.
- Functionality: Easily switch layouts without altering the entire structure of your blog.
Video Tutorial Related to This Topic
If you don’t feel like reading, then instead of reading you can watch the video below that is related to this topic.
Step-by-Step Guide
Setting Up the HTML Structure
Step 1: Login to Blogger dashboard then go to Themes.
Step 2: Click on the icon next to the Customize button.
Step 3: Now press Ctrl + F
and search for the titlePost inside your blogger template. You should see the code below after searching.<!--[ Change <data:messages.latestPosts/> to replace 'Latest Posts' with your special text ]--> <h2 class='title dt'><data:messages.latestPosts/></h2>
Step 4: Now replace the code below with <h2 class='title dt'><data:messages.latestPosts/></h2>
<div class='tn-credit' made-by='WIKIFORTECH | YouTube' style='display: none;'/>
<h2 class='title'><data:messages.latestPosts/></h2>
<div class='gridMode dt'>
  <label> Grid
    <input id='toggleSwitch' type='checkbox'/>
    <svg class='line' id='toggleIcon' viewBox='0 0 24 24'>
      <path d='M10 4H14C18.42 4 22 7.58 22 12C22 16.42 18.42 20 14 20H10C5.58 20 2 16.42 2 12C2 7.58 5.58 4 10 4Z'/>
      <path class='svgG' d='M10 16C12.2091 16 14 14.2091 14 12C14 9.79086 12.2091 8 10 8C7.79086 8 6 9.79086 6 12C6 14.2091 7.79086 16 10 16Z'/>
    </svg>
  </label>
</div>
Do not remove the credit from the code. It will not be visible on your website.
Adding CSS for Layouts
Step 4: Again press Ctrl + F and search for the ]]></b:skin> tag.
Step 5: Paste the following code above ]]></b:skin> tag.
.gridMode label{display:flex;align-items:center;cursor:pointer;font-size:var(--widgetT);font-weight:var(--widgetTw);position:relative}.gridMode svg{width:22px;height:22px;margin:0 8px}.gridMode input{display:none}.svgG{fill:var(--themeC);stroke:var(--themeC)}.drK .svgG{fill:var(--darkU);stroke:var(--darkU)}@media (min-width: 501px){.gridMode{display:none}
Implementing JavaScript for the Toggle
Now we just need to add JavaScript code. Simply follow the instructions below.
Step 6: Find the </body> tag. It will be at the end of your template source code.
Copy the below code and paste it above the tag
<script>/*<![CDATA[*/
function I(){var k=['2umXePN','956958WDVogi','4378940jbSFvb','.tn-credit','318126VsjICm','toggleIcon','9KGAOCb','classList','body','oneGrd','toggleState','toggleSwitch','62704ndWcTe','innerHTML','remove','<path\x20d=\x27M10\x204H14C18.42\x204\x2022\x207.58\x2022\x2012C22\x2016.42\x2018.42\x2020\x2014\x2020H10C5.58\x2020\x202\x2016.42\x202\x2012C2\x207.58\x205.58\x204\x2010\x204Z\x27/><path\x20class=\x27svgG\x27\x20d=\x27M10\x2016C12.2091\x2016\x2014\x2014.2091\x2014\x2012C14\x209.79086\x2012.2091\x208\x2010\x208C7.79086\x208\x206\x209.79086\x206\x2012C6\x2014.2091\x207.79086\x2016\x2010\x2016Z\x27/>','<path\x20d=\x27M10\x204H14C18.42\x204\x2022\x207.58\x2022\x2012C22\x2016.42\x2018.42\x2020\x2014\x2020H10C5.58\x2020\x202\x2016.42\x202\x2012C2\x207.58\x205.58\x204\x2010\x204Z\x27/><path\x20class=\x27svgG\x27\x20d=\x27M14\x2016C16.2091\x2016\x2018\x2014.2091\x2018\x2012C18\x209.79086\x2016.2091\x208\x2014\x208C11.7909\x208\x2010\x209.79086\x2010\x2012C10\x2014.2091\x2011.7909\x2016\x2014\x2016Z\x27/>','6295416AAcCyT','onload','getItem','28xijTGJ','add','2333815xqfuzV','WIKIFORTECH\x20|\x20YouTube','made-by','change','addEventListener','off','getAttribute','421098MUvyAx','Credit\x20removed\x20or\x20modified!\x20Please\x20restore\x20the\x20original\x20credit\x20to\x20use\x20this\x20functionality.','checked','setItem','getElementById'];I=function(){return k;};return I();}var b=L;(function(J,P){var g=L,w=J();while(!![]){try{var h=-parseInt(g(0xae))/0x1+-parseInt(g(0x91))/0x2*(-parseInt(g(0x92))/0x3)+parseInt(g(0x9d))/0x4+parseInt(g(0xa7))/0x5+-parseInt(g(0x95))/0x6*(parseInt(g(0xa5))/0x7)+-parseInt(g(0xa2))/0x8*(-parseInt(g(0x97))/0x9)+-parseInt(g(0x93))/0xa;if(h===P)break;else w['push'](w['shift']());}catch(Q){w['push'](w['shift']());}}}(I,0x7e49c));function L(J,P){var w=I();return L=function(h,Q){h=h-0x90;var g=w[h];return g;},L(J,P);}function updateIcon(J){var R=L,P=document[R(0x90)](R(0x96));J?P[R(0x9e)]=R(0xa1):P['innerHTML']=R(0xa0);}document['getElementById'](b(0x9c))[b(0xab)](b(0xaa),function(){var K=b;const J=document['querySelector'](K(0x94));if(J&&J['getAttribute']('made-by')===K(0xa8)){var P=document[K(0x99)];this['checked']?(P[K(0x98)][K(0x9f)](K(0x9a)),updateIcon(!![]),localStorage[K(0xb1)](K(0x9b),'on')):(P[K(0x98)][K(0xa6)](K(0x9a)),updateIcon(![]),localStorage['setItem'](K(0x9b),K(0xac)));}else alert(K(0xaf));}),window[b(0xa3)]=function(){var X=b,J=localStorage[X(0xa4)](X(0x9b)),P=document[X(0x90)](X(0x9c));const w=document['querySelector'](X(0x94));w&&w[X(0xad)](X(0xa9))===X(0xa8)?J==='on'?(P[X(0xb0)]=!![],document[X(0x99)]['classList']['remove'](X(0x9a)),updateIcon(!![])):(P[X(0xb0)]=![],document[X(0x99)][X(0x98)][X(0xa6)](X(0x9a)),updateIcon(![])):alert(X(0xaf));};
/*]]>*/</script>
Step 7: Click the icon to save the changes.
Conclusion
Adding a toggle to switch between single and dual grid layouts in the Plus UI template is a straightforward way to enhance your blog's usability and appeal. By following this guide, you can provide your readers with a customizable experience, making your content more engaging and accessible.


